
Soldering is one of the essential processes that fix the components into a printed circuit board. It affects PCB quality and capabilities. In the PCB manufacturing factory, staff operate the soldering machine and check after the soldering by AOI machine or X-ray inspection machine to avoid soldering problems occur on finished PCBA boards.
For electronics makers or newbies, hand soldering has always been considered a trait skill to have. However, even with the specialist or automatic machine soldering, problems may have appeared. This article is a guide for PCB soldering. You will know 10 common PCB soldering problems & solutions.
Ideal Soldering Joint (THT)
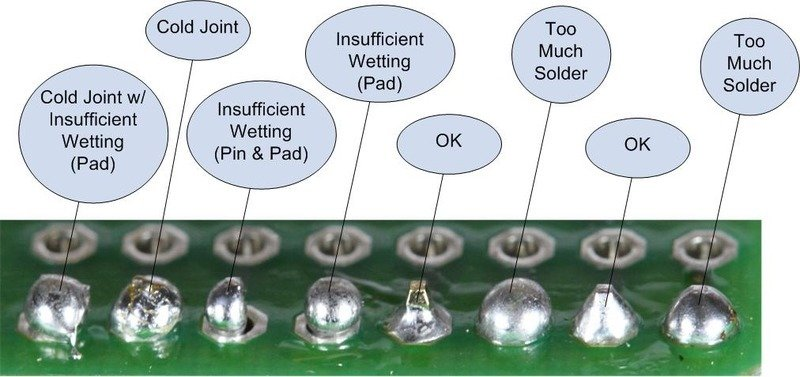
Fortunately, the majority of solder connections are fine and do not create any issues. A good solder connection will have a glossy finish and should not be too soldered. The contour of the solder surrounding the junction should be somewhat concave in most cases.
See the picture below. Could you figure out which is the ideal soldering joint?

Common Soldering Problems
The fourth from the bottom and the penultimate soldering joints are the good solderings in the picture below. Let us see 10 common hand soldering problems to avoid.
1. Solder bridge
Soldering bridging is one of the most common soldering issues that can occur on your PCB when soldering in hand or automatic soldering by machine. It will lead to a short circuit and cause a component to burn up.
For the assembly factory, this problem is related to smaller and more compact components. Including the wrong paste template when using solder flux or the mistakenly setting of assembling feeder.
Hand soldering usually resulting from the excessive use of solder between joints or operating too big or too wide soldering tips. Inappropriate soldering iron operation will also cause solder bridging.
Identifying a solder bridge is a challenge for human eyes, as it can be a microscope size. In the PCB manufacturing factory, AOI and X-ray inspection machines can easily recognize the problem avoiding taking the bad PCB into the application. As for manual soldering, if you can detect the solder bridge, it can be fixed. The only thing you need to do is melt the solder in the middle of the bridge and use a solder sucker to remove excess solder.
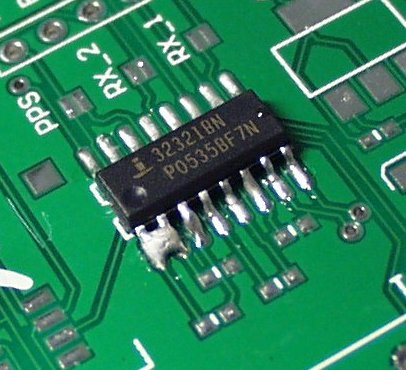
An example of a solder bridge.
2. Excessive solder
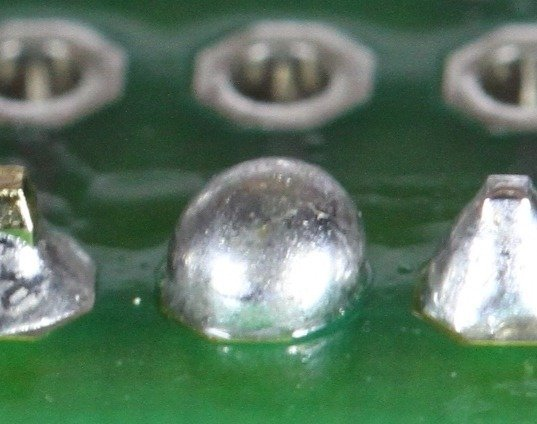
When first soldering, what I thought is more solder flux makes the components fixed stronger. However, that is a common mistake. Excessive solder will cause a ball-like pin.
Although there are no direct dangers like a short circuit, excess solder flux is one of the reasons why solder bridges generate. Moreover, excessive solder effect the proper wet between solder pins and solder pads and will contribute to a low-quality PCB. As a result, enough solder to adequately wet the soldering pin and the soldering pad (PCB board) is usually sufficient.
Calculating a good timing of solder withdrawal and removing superfluous solder flux on the pad help you avoiding excessive solder.
3. Solder Balling
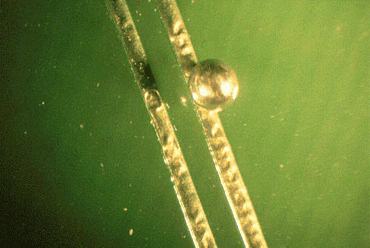
The problem with the solder ball is the frequent situation in PCB soldering. Just as its name implies, solder balls are the sphere flux that sticks to the PCB board.
When it comes to the SMT assembly line, soldering balls occur when setting the wrong temperature of the reflow oven, which is too low, leading to inappropriate solder time when the board is going through the wave crest. The excess flux will evaporate at a high temperature while splashing out from the tin bath.
When soldering by hand, you need to notice the moisture on the printed board or the components. The metal plating of hole walls is thin, or the gaps between pin and hole walls with solder flux in the hole wall. When soldering, the water vapor will exhaust from hole walls. The water vapor may extrude the solder and produce solder balls on the front side of the printed circuit board.
4. Cold joint
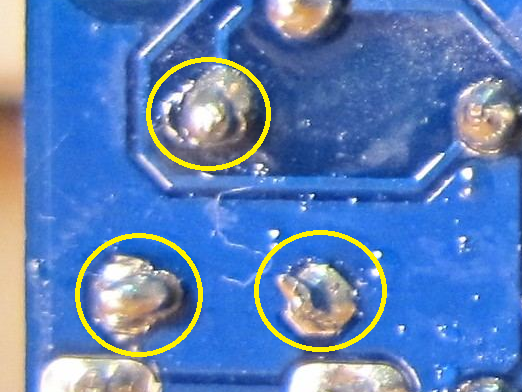
The cold joint indicates only a bad connection between the component and the PCB. This common situation can occur if you do not allow the soldering iron to heat properly when the welding temperature is too low. If left unattended, it will break, and eventually, the whole electronics element will fail.
To avoid these things appear, you should give enough time to heat the soldering iron or the joint. You should also check the iron temperature (lead-free solder has a higher melting temperature). However, when you find a stubborn solder joint and hard to liquify, you should check your PCB design.
5. Overheated joint
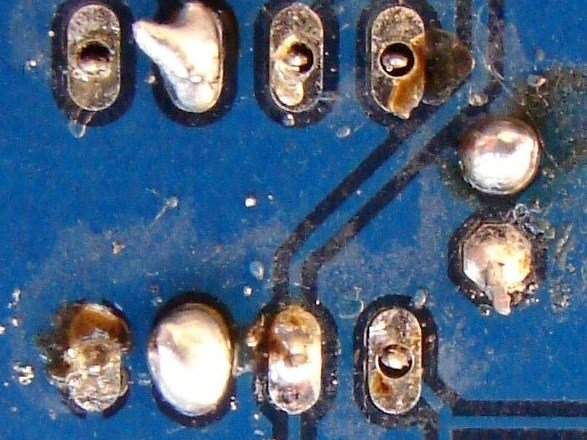
Conversely, overheating joints can occur when the PCB solder iron is too hot or when solder flux does not flow. It also causes the entire structure of electronics products to break down; therefore, you should avoid overheated joints occurring when solder.
6. Tombstoning
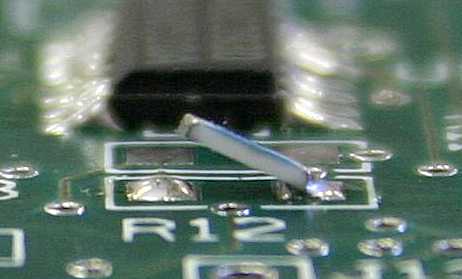
Tombstoning is a common problem in PCB soldering. It is a situation that one end of a passive component (such as a resistor) humping on the pad. This problem occurs when the solder pad has not completed the wetting process.
To avoid tombstoning, you should make sure to check the size of the pad and use a better PCB coating.
One way to avoid this is to check the size of the pad. When one side of the soldering pad is larger than the other, the excess copper will act as a heat sink. It will complete the wetting process faster.
7. Insufficient wetting
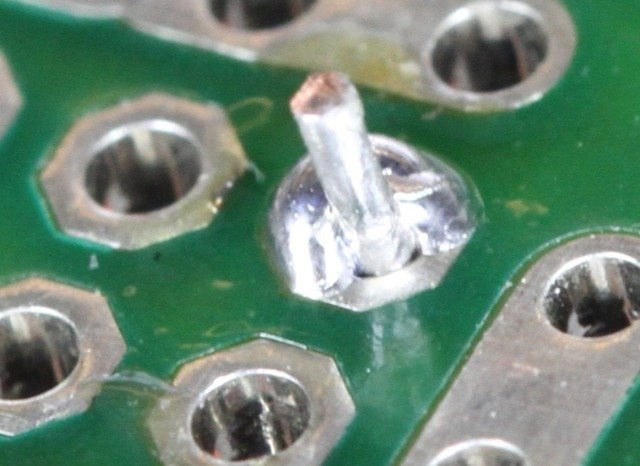
Wetting is an ideal situation when soldering. It has reached a liquid state, allowing the components to attach to the pad. If this wetting process is not doing sufficiently, the electronics components will not properly bond to the soldering pad, resulting in weak solder joints.
When the engineer does not apply enough heat to the soldering iron & pad or when he does not give enough time for the solder flux to flow, the engineer can cause this situation. Moreover, cleaning the PCB and heating the pads and pins will all help prevent this problem.
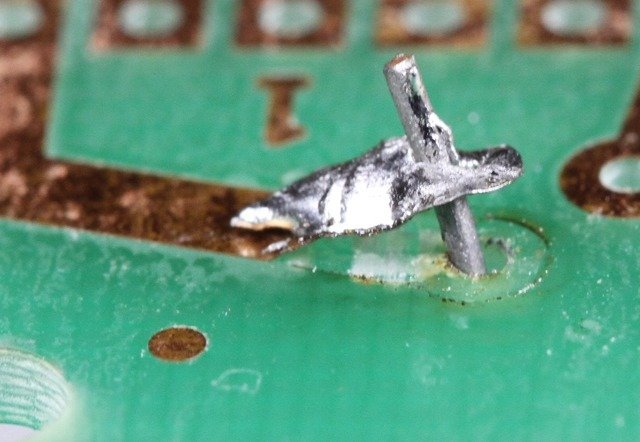
8. Lifted pads
As the name implies, when the pad of the component is humped from the circuit board, the soldering pad will rise. It usually happens when you try to remove an incorrectly soldered part. Higher soldering temperatures or excessive force applied to any joint can also cause the solder pads to lift.
As the soldering pad becomes brittle, these problems make the soldering pad hard to use. Some specific circuit boards are prone to this problem, especially those designed with a thin copper layer.
9. Solder starved
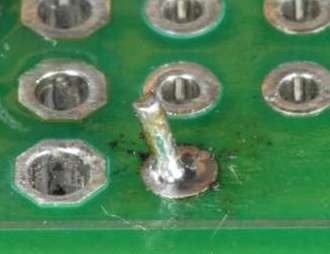
Starved solder joints are solder joints with insufficient solder, resulting in a lack of reliable electrical contact in the solder joints. It occurs when lead heating inadequacy.
Although the joint can still perform its function, it has the disadvantage of a weaker joint. Over time, stress cracks will develop and cause the solder joint to disable. Try to reheat the solder joint to solve this problem.
10. Solder splashes/Webbing
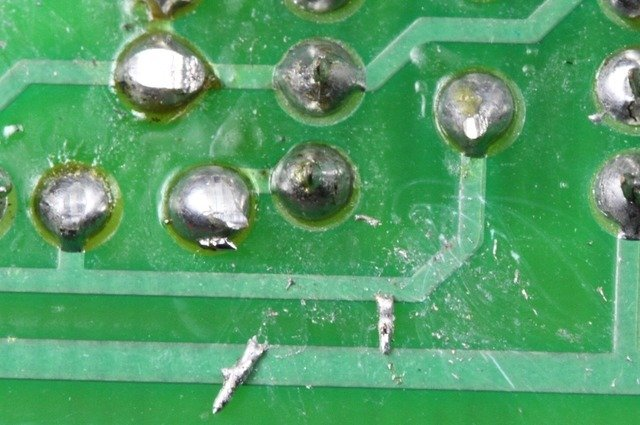
Excessive flux or improper preheating can cause the solder to spatter. The solder splashes will cause the solder fragments to adhere to the solder mask in the form of a spatter. Generally, make sure the PCB surface is clean before soldering. This behavior will help you prevent solder splashes.
How to Avoid Soldering Problems?
1. Clean the pads and joints
One of the primary causes of bad hand-welded connections is inadequate soldering tip care. Any dirt or oxidation on the needle's tip will diminish the soldering iron's heat conductivity, lowering the solder joint's quality. As a result, it's critical to take proper care of the welding head. Remember to clean the tip of the iron with a cleaning pad before commencing to solder.
2. Select PCB Assembly
Generally, adding fiducial marks to your PCB files is a good way for accurate soldering. These marks guide pick and place machine put components to the right place and improve the correctness in soldering.
Nowadays, companies like PCBgogo provide the turnkey PCB assembly service, which means you can order PCB manufacturing from the company and assign them source and install components. You will receive a final PCBA board. Ordering turnkey PCBA services save your time when programming a testing schedule. Flex PCB and rigid-flex PCB are all available to have the assembly service in PCBgogo. You could find SMD, through-hole, BGA, Micro BGA, QFN, and others assembly types in there.
- Comments(8)
**
Apr 29.2024, 14:59:25
**
Apr 08.2024, 23:07:15
**
Apr 04.2024, 23:48:35
**
Mar 21.2024, 15:42:58
T****ank
Mar 19.2024, 18:49:28
**
Mar 11.2024, 20:17:55
**
Nov 23.2023, 09:52:04

